
How to Restore Your Brake Lights Permanently: Step-by-Step Guide
To restore faded or cloudy brake lights for the longest-lasting result, clean the lens, remove the oxidized surface, polish it smooth, and finish with a durable UV-resistant protection designed for automotive plastic. Polishing alone may improve clarity temporarily, but protection is what helps prevent the haze from quickly returning.
Brake-light and tail-light lenses can become dull, cloudy, scratched, or faded after years of exposure to sunlight, weather, road contamination, and repeated washing. In many cases, the damage is concentrated on the outside surface, which means the lens can often be restored instead of replaced.
The important part is understanding that a quick shine is not the same as a lasting restoration. If you remove oxidation but leave the plastic unprotected, the haze may return much sooner.
What Does It Mean to Restore Brake Lights?
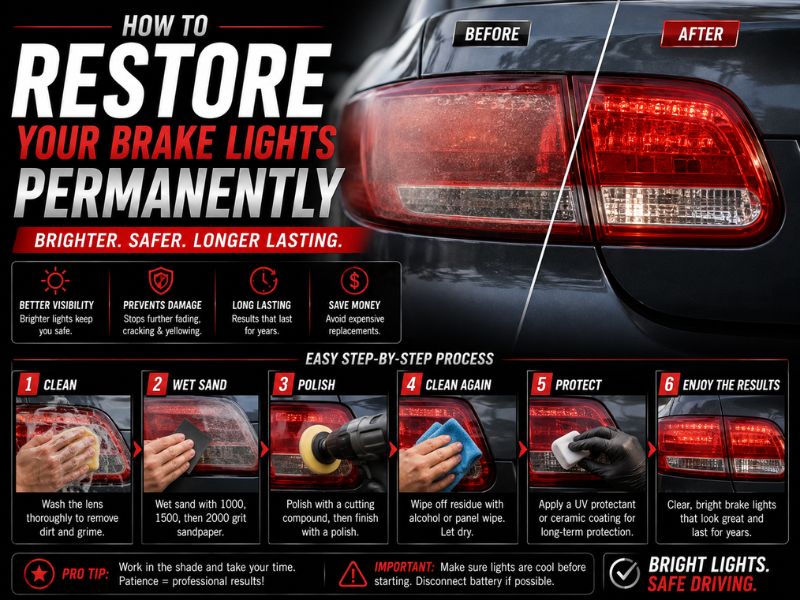
Brake-light restoration usually refers to improving the condition of the exterior lens.
It may help with:
- Cloudiness
- Dull plastic
- Surface oxidation
- Light scratches
- Faded appearance
- Weathered clear sections
It does not fix an electrical brake-light problem.
If the brake light does not illuminate, flickers, or remains unusually dim after the lens is clean, the problem may involve:
- Bulb
- Fuse
- Socket
- Wiring
- Ground connection
- LED module
- Internal reflector
Lens restoration and electrical repair are two different jobs.
Why Do Brake-Light Lenses Become Cloudy or Faded?
Exterior lamp lenses spend their entire lives exposed to the environment.
Common causes of deterioration include:
- UV radiation
- Heat
- Rain
- Road salt
- Dirt
- Improper chemicals
- Automatic car washes
- Fine scratches
- Aging protective coatings
The plastic underneath may still be structurally usable even when the outer surface looks terrible.
In many cases, restoration works because you are removing or refining the damaged surface rather than replacing the entire lens.
Can Brake Lights Really Be Restored Permanently?
Not literally forever.
No exterior plastic finish can be guaranteed to remain unchanged indefinitely while exposed to sunlight, weather, washing, and road debris.
A better way to think about “permanent” restoration is long-lasting restoration.
Temporary Restoration
A quick treatment may involve:
- Cleaning
- Light polishing
- Applying wax
- Applying an oily product
This can make the lens look better immediately, but the effect may disappear relatively quickly.
Long-Lasting Restoration
A more complete restoration usually involves:
- Removing damaged oxidation
- Refining the surface
- Polishing to restore clarity
- Adding fresh UV protection
The protection stage is what separates a quick cosmetic improvement from a durable restoration.
First, Determine Whether the Damage Is Outside or Inside
Before sanding anything, identify where the problem actually is.
Signs of Exterior Damage
The problem may be on the outside if:
- Lens feels rough
- Surface looks chalky
- Fine scratches are visible
- Haze changes when the lens is wet
- Polishing a small test area improves clarity
Exterior oxidation is often restorable.
Signs of Interior Damage
The problem may be internal if you see:
- Water droplets inside
- Internal fogging
- Damaged reflector
- Melted plastic
- Discoloration behind the lens
- Haze that cannot be felt or changed from outside
Polishing the exterior will not repair internal damage.
What You Need to Restore Brake-Light Lenses
Useful supplies may include:
- Automotive wash soap
- Water
- Microfiber towels
- Painter’s tape
- Plastic-safe cleaner
- Wet/dry sandpaper if needed
- Spray bottle
- Plastic polish or compound
- Foam or microfiber applicator
- UV-resistant plastic protection
Optional tools can include:
- Dual-action polisher
- Drill polishing attachment
You do not need every item for every job.
A mildly dull lens may only need cleaning, polishing, and protection.
Step 1: Wash the Brake-Light Lens
Start with a clean surface.
Remove:
- Dirt
- Bugs
- Road film
- Grease
- Wax residue
Use an automotive-safe wash method and dry the lens with a clean microfiber towel.
This step matters because sanding or polishing over dirt can drag abrasive particles across the plastic and create unnecessary scratches.
Step 2: Inspect the Lens Closely
Once clean, examine the plastic under good lighting.
Look for:
- Oxidation
- Yellowing
- Fine scratches
- Deep scratches
- Cracks
- Chips
- Moisture
- Surface peeling
- Uneven clear coating
This inspection determines how aggressive the restoration needs to be.
If the lens is only mildly dull, start with polishing.
If the surface is heavily oxidized, sanding may be necessary.
Step 3: Mask the Surrounding Area
Protect the paint and trim around the brake light with painter’s tape.
This is especially important if you will be:
- Wet sanding
- Machine polishing
- Applying a coating
Edges around tail lights can be narrow, and it is easy for sandpaper or a polishing pad to contact painted surfaces.
Can You Restore Brake Lights Without Sanding?
Yes.
Sanding is not always necessary.
If the damage is mild, try:
- Cleaning the lens
- Applying a plastic-safe polish
- Buffing the surface
- Applying UV protection
This may be enough for:
- Light haze
- Minor scratches
- Mild dullness
Sanding is more appropriate when oxidation is too deep for polishing alone.
Do not sand just because it appears in many restoration videos.
Use the least aggressive method that solves the problem.
Step 4: Wet Sand Heavy Oxidation
If the lens has significant oxidation, controlled wet sanding can remove the damaged surface.
Keep the lens and abrasive lubricated.
Use:
- Even pressure
- Consistent strokes
- Controlled passes
Avoid staying too long on:
- Edges
- Raised lettering
- Sharp contours
The goal is to create a uniform surface rather than grind deeply into the plastic.
If you are using a restoration system, follow its abrasive sequence rather than inventing your own.
Why Does the Brake Light Look Worse After Sanding?
This is normal during a proper restoration.
After the first abrasive stage, the lens may look:
- Frosted
- Dull
- Uniformly cloudy
That can be alarming if you have never restored plastic before.
The initial sanding stage removes damaged material but leaves fine sanding marks behind.
Later abrasive stages and polishing gradually remove those marks and restore transparency.
A uniformly hazy lens is often easier to refine than one with random oxidized and glossy patches.
Step 5: Refine the Sanding Marks
Do not jump directly from aggressive sanding to final polish.
Progressively refine the surface so each step removes the scratches created by the previous one.
The goal is to create smaller and smaller surface marks until the polishing stage can remove them efficiently.
Skipping refinement can leave:
- Visible scratches
- Uneven clarity
- Cloudy patches
Take your time here.
The clearer the lens becomes before final polishing, the easier the polishing stage will be.
Step 6: Polish the Brake-Light Lens
After sanding is complete, polish the lens with a plastic-compatible polish or compound.
You can polish:
- By hand
- With a suitable machine
Work the product evenly across the lens.
You should see:
- Haze decrease
- Gloss increase
- Sanding marks disappear
- Lens clarity improve
If using a machine, keep speed and pressure controlled.
Plastic can overheat.
Excessive heat can cause:
- Distortion
- Surface damage
- Additional haze
Do not hold a polishing pad in one spot for long periods.
Step 7: Remove Polishing Residue
Before applying protection, clean the surface according to the coating or sealant instructions.
Residual:
- Compound
- Oil
- Wax
- Silicone
can interfere with adhesion.
Use clean microfiber towels and make sure the surface is completely prepared for the protective layer.
This step becomes especially important when using a durable coating.
Step 8: Apply UV Protection
This is the most important part if you want the restoration to last.
A freshly polished lens may look perfect, but polishing can leave the plastic with reduced protection against future UV exposure.
Suitable options may include:
- Headlight or tail-light restoration coating
- Automotive plastic UV protectant
- Compatible protective clear coating
- Protective film
The exact product should be designed for the lens material.
A polished lens without restored UV protection is an incomplete restoration.
Clear Coat vs. UV Sealant vs. Protective Film
Different protection methods offer different tradeoffs.
| Protection | Durability Potential | Difficulty | Main Consideration |
| UV sealant | Moderate | Easy | May require periodic renewal |
| Restoration coating | Good | Moderate | Surface preparation matters |
| Compatible automotive clear | Potentially durable | Higher | Must be plastic-compatible |
| Protective film | Good potential | Moderate | Installation quality matters |
No option should be treated as maintenance-free forever.
Environmental exposure will still affect the surface over time.
Can You Use Automotive Clear Coat on Brake Lights?
Sometimes, but compatibility is critical.
Do not assume every transparent spray coating is suitable for automotive lamp plastic.
An incompatible coating can cause:
- Cloudiness
- Softening
- Adhesion problems
- Orange peel
- Cracking
- Peeling
Some clear coatings contain solvents that may react poorly with certain plastics.
If you choose a clear protective coating, make sure it is intended for the material and application.
Random household clear spray is not a good substitute.
Can You Use Headlight Restoration Products on Brake Lights?
Often, yes, but check compatibility first.
Many headlights and tail lights use similar exterior plastics, but not every lamp is constructed exactly the same way.
Brake-light lenses may be:
- Red plastic
- Clear plastic over colored internal elements
- Textured
- Coated
A product designed for exterior automotive plastic may work well, but always follow its instructions.
How to Restore Faded Red Tail Lights
A faded red tail-light lens may look:
- Pink
- Chalky
- Dull
- Washed out
If the fading is mainly caused by surface oxidation, polishing can often improve the color dramatically.
Removing the dull outer layer allows the original color underneath to appear richer.
However, if the actual color layer or plastic has degraded deeply, polishing may not restore the original red completely.
Do not confuse tinting with restoration.
Adding a darker coating may change appearance, but it does not repair damaged plastic and may affect light output or legality.
Can You Restore Scratched Brake Lights?
Fine surface scratches can often be reduced significantly.
Light scratches may respond to:
- Plastic polish
- Fine abrasive refinement
Deeper scratches are harder.
If you can easily catch a fingernail in the scratch, complete removal may require removing a significant amount of material.
In some cases, it is safer to reduce the scratch rather than attempt to eliminate it completely.
Cracks are different.
A cracked brake-light lens is not a polishing problem.
What If There Is Moisture Inside the Brake Light?
If the haze or water is inside the housing, exterior restoration will not fix it.
Check for:
- Cracked lens
- Failed housing seam
- Bulb access seal
- Rear cover
- Vent problem
Standing water can eventually damage:
- Bulb sockets
- Connectors
- Reflectors
- LED electronics
Drying the housing is only part of the solution. The leak source also needs to be repaired.
What If the Brake Light Is Still Dim After Restoration?
If the lens is clear but the light remains weak, look beyond the exterior plastic.
Possible causes include:
- Aging bulb
- Incorrect bulb
- Corroded socket
- Poor ground
- Voltage problem
- Connector corrosion
- Failing LED module
- Internal reflector deterioration
A clear lens cannot compensate for a weak electrical or optical system.
Can You Use Toothpaste to Restore Brake Lights?
Toothpaste may provide a mild abrasive effect.
It can sometimes improve very light haze.
However, it is not an ideal long-term restoration method because:
- Abrasive level is inconsistent
- It may leave residue
- It does not restore proper UV protection
- Results are usually limited on severe oxidation
It may make a lens look better temporarily, but a purpose-designed plastic restoration process is more predictable.
Can You Use WD-40 or Oil on Faded Tail Lights?
Oily products may temporarily make faded plastic appear:
- Darker
- Glossier
- Clearer
This can create a dramatic before-and-after effect.
But the effect is mostly cosmetic.
Oil does not properly remove deep oxidation or rebuild UV protection.
Once the residue wears away, the dull appearance often returns.
Temporary shine is not restored plastic.
Why Did My Restored Brake Lights Turn Cloudy Again?
Several things can cause haze to return.
Possible reasons include:
- Oxidation was not fully removed
- UV protection was skipped
- Protective coating failed
- Surface was contaminated before coating
- Harsh chemicals were used afterward
- Aggressive washing damaged the finish
- The original problem was internal
If the lens becomes cloudy shortly after polishing, missing or inadequate protection is a common reason.
How to Make Brake-Light Restoration Last Longer
After restoration:
- Use automotive-safe wash products
- Avoid strong solvents
- Avoid aggressive abrasive cleaners
- Keep the lenses clean
- Renew protection when required
- Inspect for new scratches
- Address water leaks quickly
Gentle maintenance preserves the restored surface.
Repeatedly polishing the lens aggressively will eventually remove more material than necessary.
When Should You Replace Instead of Restore?
Restoration is not always the right solution.
Consider replacement when:
- Lens is badly cracked
- Plastic has deep crazing
- Housing leaks repeatedly
- Lens is melted
- Internal reflector is damaged
- LED electronics have failed
- Color degradation is internal
- Mounting points are broken
- Restoration no longer produces acceptable clarity
Sometimes replacement is more reliable than repeatedly repairing a severely damaged assembly.
Common Brake-Light Restoration Mistakes
Avoid these errors:
- Sanding a lens that only needed polishing
- Starting with an abrasive that is too aggressive
- Using dirty sandpaper
- Skipping progressive refinement
- Overheating the plastic
- Leaving polish residue
- Skipping UV protection
- Applying incompatible clear coat
- Using harsh household solvents
- Trying to polish internal damage
- Ignoring water intrusion
- Assuming a clear lens will fix a weak bulb
Frequently Asked Questions
How Do You Restore Brake Lights Permanently?
Clean the lens, remove oxidation, polish the plastic, and apply durable UV protection. No exterior restoration is literally permanent, but proper protection can make the result last much longer.
Can Cloudy Brake Lights Be Restored?
Yes, if the cloudiness is mainly caused by exterior oxidation or light surface damage.
Can You Restore Brake Lights Without Sanding?
Yes. Mild haze may only require plastic-safe polishing and UV protection.
Can I Use Headlight Restorer on Tail Lights?
Often, but verify that the product is compatible with the brake-light lens material.
How Do You Restore Faded Red Tail Lights?
Clean and polish the oxidized exterior surface, then apply suitable UV protection. Deep internal color fading may not be completely reversible.
Can You Polish Brake-Light Lenses?
Yes. Plastic-safe polishing can remove mild oxidation and fine scratches.
Can You Clear-Coat Brake Lights?
A compatible automotive plastic coating may be used, but random clear coats can damage the lens or fail to bond correctly.
Why Did My Brake Lights Turn Cloudy Again?
The oxidation may not have been fully removed, or the lens may have been left without adequate UV protection.
Does Toothpaste Restore Brake Lights?
It may improve very light haze temporarily, but it is not a complete long-term restoration method.
Can WD-40 Restore Faded Tail Lights?
It may temporarily improve appearance, but it does not properly remove oxidation or provide durable UV protection.
What If My Brake Light Is Still Dim After Polishing?
Check the bulb, socket, wiring, grounds, LED module, and internal reflector.
When Should a Brake-Light Assembly Be Replaced?
Replace it when the lens is badly cracked, the housing cannot stay sealed, electronics are damaged, or the plastic is too deteriorated for useful restoration.
Conclusion
If you want to restore your brake lights permanently—or as close to permanent as an exterior plastic restoration can realistically get—the key is to remove the damaged surface, polish the lens properly, and restore durable UV protection rather than relying on temporary shine.
Start by determining whether the damage is actually on the outside. Surface oxidation, mild scratches, and faded plastic are often good candidates for restoration. Internal moisture, electrical faults, melted components, and broken housings require different repairs.
Mild damage may only need polishing, while heavy oxidation can require controlled wet sanding followed by progressive refinement. The restoration should then be polished until the plastic becomes clear again.
The final protective step is what makes the biggest difference in longevity.
Without UV protection, a freshly polished brake-light lens can begin deteriorating again much sooner than expected.
Avoid shortcuts such as oils, WD-40, or toothpaste if your goal is a durable result. They may create a quick cosmetic improvement, but they do not replace a complete restoration process.
The difference between a temporary brake-light cleanup and a long-lasting restoration is protection. Removing oxidation makes the lens clear again; restoring UV protection helps keep it that way.
