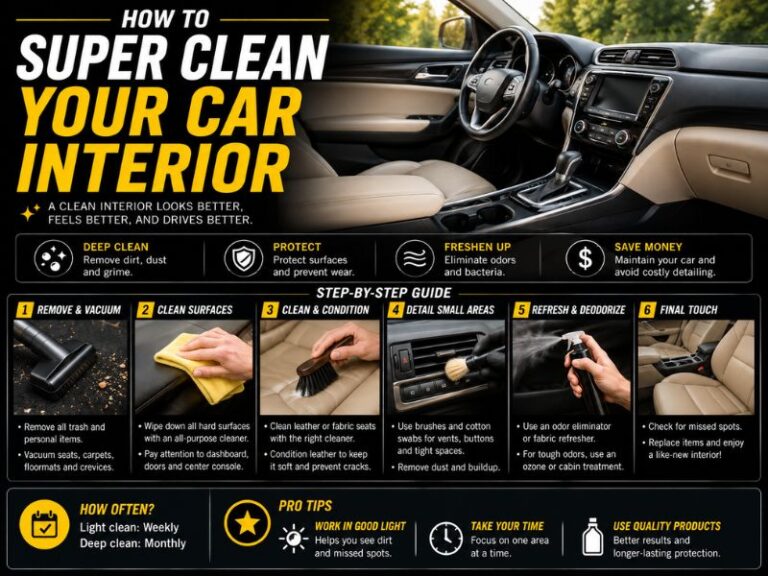
Can I Clean Leather Car Seats with Soap and Water Detailed Guide
Yes, you can usually clean leather car seats with a small amount of mild soap and water, provided you use a damp—not soaking wet—cloth and dry the leather promptly. Avoid harsh detergents, excessive water, and vigorous scrubbing, because these can damage the finish, leave residue, or push moisture into seams and perforations.
Most modern vehicle seats are made from coated leather or leatherette, so light surface dirt, body oils, and small spills can often be removed safely at home. The important distinction is between a seat that looks dusty or slightly greasy and one showing cracking, peeling, dye transfer, deep staining, or water damage. A gentle cleaning can address the first group, but it may worsen the second if the surface is already failing.
Think of the process like washing a painted wooden cabinet: a barely damp cloth lifts grime, while a saturated rag can work moisture into joints and soften or stain the finish. This guide explains which soap is safest, how much water to use, the correct cleaning steps, when conditioning helps, and which warning signs mean you should stop cleaning and seek professional leather repair.
When Soap and Water Are Safe for Leather
Soap and water are generally suitable for routine cleaning when the seat has a smooth, intact surface and only light contamination. Common examples include dust, fingerprints, sunscreen residue, mild perspiration, and small amounts of food or drink residue.
Modern automotive leather is often protected by a clear polyurethane coating. That coating makes the surface more resistant to everyday moisture than unfinished leather, but it does not make the seat waterproof or immune to chemicals. Water can still enter through stitching, perforations, cracks, loose seams, and damaged finish layers.
Use extra caution if the seat is labeled aniline leather, semi-aniline leather, suede, nubuck, or another porous material. These surfaces absorb liquids more readily than typical coated automotive leather and may require a specialty cleaner or professional treatment. If the vehicle owner’s manual gives different instructions, follow those instructions first.
What Kind of Soap Should You Use?
The safest homemade mixture is usually a few drops of mild, dye-free liquid soap in a bowl of lukewarm water. A gentle soap intended for sensitive skin or a purpose-made automotive leather cleaner is preferable to a strong household detergent.
Dish soap may work in a very diluted solution for an isolated cleanup, but it is not the best routine choice. Many dishwashing products are designed to break down grease aggressively, and repeated use may remove protective oils from unfinished leather or leave an irritating film on coated leather.
Do not use bleach, ammonia, abrasive powder, disinfecting wipes, alcohol, acetone, furniture polish, or multipurpose degreasers unless the vehicle manufacturer specifically approves the product. These chemicals can discolor the surface, make it brittle, or alter the texture and sheen.
Avoid heavily scented soaps, colored cleaners, and products containing strong solvents. The goal is to loosen grime while leaving as little residue as possible.
How to Test the Cleaning Mixture
Before cleaning the visible part of a seat, test the solution in a hidden area, such as beneath the front edge or on a less noticeable side panel. Apply a small amount with a white microfiber cloth, wipe gently, and wait until the area is completely dry.
Look for color transfer, darkening, stickiness, roughness, streaks, or a change in gloss. If the test area reacts badly, stop and use a cleaner recommended for that specific leather type.
A white cloth is useful because it shows whether dye is lifting from the seat. A small amount of grime on the cloth is normal, but significant color transfer may indicate that the finish or dye is unstable.
What You Need Before Cleaning
Gather the supplies before applying any liquid to the seat. Keeping the process controlled reduces the temptation to over-wet the leather or leave soap sitting on the surface.
- Two or three clean, soft microfiber cloths
- A small bowl of lukewarm water
- A few drops of mild, dye-free soap or an approved leather cleaner
- A soft-bristled detailing brush for seams and texture
- A dry towel for final drying
- A leather conditioner only if the material and manufacturer instructions support its use
Vacuum loose grit first, especially around seams and seat creases. Sand and dust can act like fine abrasives when rubbed across the finish, causing unnecessary dulling or fine scratches.
Step-by-Step Method for Cleaning Leather Seats
1. Remove Loose Dirt
Use a vacuum with a soft brush attachment to remove crumbs, sand, pet hair, and dust. Do not drag a hard plastic nozzle across the leather, and pay attention to the gap between the seat cushion and backrest.
If the seat has perforations, vacuum gently rather than pushing debris deeper into the holes. A soft detailing brush can loosen particles around stitching without scraping the surface.
2. Prepare a Very Diluted Solution
Add a few drops of mild soap to lukewarm water and mix it lightly. The mixture should feel slick but not heavily sudsy; too much soap increases the amount of residue that must be removed.
Never pour the solution directly onto the seat. Liquid should be applied to the cloth, not the leather.
3. Wring Out the Cloth Thoroughly
Dip a microfiber cloth into the solution and wring it until it is only damp. It should not drip when held over the bowl. This is particularly important for perforated seats, where liquid can reach foam, heating elements, ventilation components, or wiring.
Work on a small section at a time. A controlled area makes it easier to notice color changes or finish problems before they spread.
4. Wipe Gently
Use light, overlapping strokes to lift surface grime. Do not scrub aggressively, use a stiff brush on broad panels, or repeatedly rub one stained spot in an attempt to force it clean.
For textured sections and stitching, use a soft brush with minimal pressure. Keep the brush damp rather than wet, and wipe away loosened dirt with a separate microfiber cloth.
5. Remove Soap Residue
Use a second cloth dampened with clean water to wipe the area. This step matters because dried soap can create a cloudy film, attract more dirt, or leave the leather feeling tacky.
The rinse cloth should also be well wrung out. You are removing residue, not soaking the seat.
6. Dry the Surface
Pat the cleaned area with a dry microfiber towel, then allow it to air-dry with the vehicle doors or windows open when conditions are safe. Keep the seat out of intense direct heat while it dries.
Do not use a hair dryer, heat gun, or heated blower. Excessive heat can shrink leather, harden the finish, and worsen existing cracks.
How to Handle Spills and Greasy Marks
Fresh spills are easier to remove than old stains. Blot liquid with an absorbent cloth instead of rubbing it outward across the seat. Once the excess is removed, use the mild solution sparingly and dry the area completely.
For greasy marks from sunscreen, lotion, or food, several light cleaning passes are safer than one forceful scrubbing session. If the mark remains after the surface is clean and dry, it may have penetrated the finish or caused a dye change rather than being simple surface dirt.
Ink, permanent marker, nail polish, paint, and heavy dye transfer should not be treated casually with household solvents. Alcohol or acetone may remove the stain while also removing the seat’s color and protective coating. A professional leather technician can assess whether the mark can be lifted without creating a larger damaged area.
Should You Condition Leather After Cleaning?
Conditioning is not automatically required after every light cleaning. Many coated automotive leather seats have a protective topcoat that prevents most conditioners from penetrating deeply, and heavy products can leave a greasy film that attracts dust.
If the leather manufacturer or vehicle manual recommends a conditioner, apply a product made for automotive leather and use a small amount. Spread it evenly, allow the stated dwell time, and buff away excess with a clean cloth.
Conditioner cannot repair peeling coating, missing color, deep cracks, or structural damage. If the surface is flaking or feels rough because the finish has failed, adding more product may temporarily change its appearance without solving the problem.
Cleaning Different Leather Seat Conditions
Perforated Leather
Perforated seats require less liquid than solid leather. Moisture can enter the holes and remain below the surface, potentially creating odors or affecting seat ventilation and heating components.
Use a nearly dry cloth, avoid spraying, and do not flood the perforations with cleaner. If a spill has soaked into the holes, professional extraction may be safer than repeatedly wetting the seat at home.
Cracked or Peeling Leather
Cracks expose weaker material beneath the finish. Cleaning is still possible, but use minimal pressure and moisture. Scrubbing can lift loose coating and make the damaged area larger.
Peeling usually indicates a failing surface coating, commonly on heavily used bolsters. Soap and water can remove dirt around the damage, but they cannot restore the original finish.
Light-Colored Leather
White, cream, and tan seats show dirt quickly, but aggressive cleaning is not the answer. Repeated rubbing can create shiny spots or remove pigment, while some dyes from jeans, bags, and clothing may be difficult to reverse.
Clean transfer marks promptly with an approved leather cleaner. If the color remains after a gentle attempt, stop rather than escalating to a harsh household product.
Suede, Nubuck, and Unfinished Leather
Do not assume that instructions for smooth coated leather apply to suede, nubuck, or aniline leather. These materials have different absorption and finishing characteristics, and water can leave permanent dark patches or rings.
Use the care instructions supplied with the vehicle or upholstery material. When the material is unknown, a small professional assessment is safer than testing a large visible area.
Common Mistakes That Damage Leather Seats
The most frequent mistake is using too much water. A wet seat may look cleaner temporarily, but trapped moisture can create odors, encourage deterioration around seams, and reach electrical parts inside the cushion.
- Spraying cleaner directly onto the seat
- Using a saturated towel or repeatedly rinsing with water
- Scrubbing with a rough sponge, brush, or melamine foam
- Leaving soap residue on the surface
- Drying leather with intense heat or parking it in harsh direct sun
- Using household disinfectants, bleach, solvents, or strong degreasers
- Ignoring peeling, dye transfer, or color loss after a test wipe
Another mistake is cleaning only the visibly dirty patch with excessive pressure. Gentle cleaning of the whole affected section usually produces a more even appearance and reduces the chance of creating a polished-looking spot.
When to Stop and Seek Professional Help
Stop home cleaning if the surface becomes sticky, changes color, sheds pigment, develops a cloudy patch, or starts peeling. These signs suggest that the finish may be chemically damaged or unstable.
Professional help is also appropriate for deep-set stains, extensive dye transfer, mold, liquid that has soaked into perforations, burned leather, large tears, and severe cracking. A specialist may be able to clean, recolor, repair, or replace the affected section, depending on the material and damage.
If a spill reaches seat controls, wiring, heating elements, or ventilation equipment, avoid adding more liquid. Have the seat inspected if electrical functions stop working or if moisture remains trapped inside.
How Often Should You Clean Leather Car Seats?
Light dusting and vacuuming can be done regularly, while a damp-cloth cleaning is usually needed only when the seats show visible grime or feel contaminated with body oils. Cleaning too frequently with soap may remove surface protection and create unnecessary wear.
Wipe spills as soon as practical, but do not turn every small mark into a heavy wet-cleaning project. Routine prevention—such as removing food promptly, limiting prolonged exposure to direct sun, and using products approved for the seat material—helps preserve the finish.
Inspect high-contact areas such as the driver’s outer bolster, steering-side seat edge, and seat belt contact points. These areas often show wear before the center of the cushion and may need specialized repair rather than stronger cleaning.
Conclusion: Use Minimal Moisture and Mild Soap
For most intact, coated leather car seats, a few drops of mild soap in lukewarm water can safely remove light dirt when applied with a well-wrung microfiber cloth. Vacuum first, test in a hidden area, clean gently, wipe away residue, and dry the seat promptly.
The major limitation is that soap and water cannot repair peeling finish, deep stains, porous leather damage, or moisture that has entered perforations and seat electronics. If the surface reacts during testing or the problem goes beyond surface grime, stop and consult the vehicle’s care instructions or a leather repair professional.