Do You Need Primer for Car Paint: What to Know and Why It Matters
Usually, yes—primer is needed when automotive paint is applied to bare metal, body filler, plastic, or a repaired area. It may not be necessary over sound, properly prepared factory paint, but skipping it in the wrong situation can lead to poor adhesion, visible repairs, corrosion, and early peeling.
A small change in the surface can change the entire recommendation. A panel that looks uniformly painted may contain exposed steel around a chip, porous filler beneath a feathered edge, or old paint that is too glossy for a new coating to grip. Paint can hide those details until the finish begins to fail.
This article explains when primer matters, which type fits metal, filler, or plastic, and how surface preparation affects the result. You will also learn when primer is unnecessary, how to apply it correctly, which warning signs call for professional repair, and how to decide whether a quick touch-up or a complete refinishing process makes sense.
What Automotive Primer Actually Does
Primer is the preparation layer between the vehicle’s surface and its color coat. It is not simply an extra coat of paint; its job is to create a stable, compatible foundation for the products applied afterward.
Depending on the formula, primer can provide corrosion protection, improve paint adhesion, fill minor sanding scratches, seal porous body filler, and create a uniform color for the topcoat. Some primers perform one primary function, while others combine several of these properties.
Automotive refinishing usually involves more than one coating. A typical repair may include bare metal, epoxy or self-etching primer, a high-build surfacer, basecoat, and clearcoat. A small aerosol repair may use fewer layers, but the underlying principles remain the same.
Primer cannot replace cleaning, sanding, or proper curing time. It can bond only as well as the surface allows, and it cannot reliably conceal deep corrosion, grease, loose paint, or major bodywork defects.
When Primer Is Necessary
Primer is strongly recommended whenever the repair exposes the original substrate or changes its texture. The following situations generally justify priming before color paint.
Bare steel or exposed iron
Freshly sanded steel is vulnerable to moisture and oxidation. Even fingerprints can leave contaminants that interfere with adhesion, while humidity can begin corrosion before the color coat is applied.
An epoxy primer is often used as a durable barrier over clean bare metal. A self-etching primer may also be appropriate for certain small repairs, but products differ in compatibility and application limits. Always follow the label regarding metal type, sanding, recoat windows, and the next coating.
Body filler and glazing putty
Body filler is porous and usually has a different texture and absorption rate from surrounding paint. Applying color directly over it can create dull spots, uneven coverage, or a visible outline around the repair.
Primer surfacer or high-build primer helps seal and level the area after the filler has been shaped. Several thin coats, followed by proper block sanding, are generally more effective than one heavy application.
Deeply sanded or feathered repairs
A repair that extends through the clearcoat and color layer may expose primer, filler, or metal in the same area. Even if most of the panel still has original paint, the exposed sections need a compatible foundation before refinishing.
The primer should extend slightly beyond the bare or repaired area, but it should not be sprayed carelessly across a large panel without proper blending and sanding. The transition must be smooth enough that the new finish does not reveal a hard edge.
Rust repair
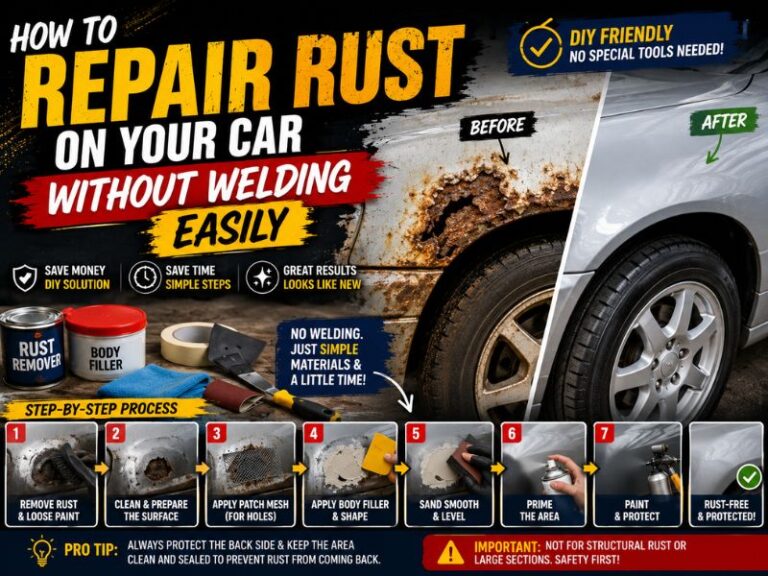
Primer is part of a rust-repair system, not a cure for active corrosion. If rust remains beneath the coating, it can continue spreading and eventually lift the new paint.
Rusted metal must be cleaned, cut out, treated, or otherwise repaired according to the severity of the damage. Surface rust may be removed mechanically, but bubbling paint often indicates corrosion beneath the visible area. Primer should be applied only after the substrate is sound, clean, and dry.
Plastic and flexible parts
Bumpers, mirror covers, trim, and some body panels may be made from plastics that do not accept ordinary metal primer well. These parts can flex, and their surface may contain mold-release residue or other contaminants.
Use a plastic adhesion promoter or a primer specifically labeled for the material. Thorough cleaning and scuffing are essential, but overly aggressive sanding can gouge soft plastic and leave defects that show through the finish.
When You May Not Need Primer
Primer is not automatically required for every paint job. If the existing finish is firmly attached, free from corrosion, properly sanded, and compatible with the new paint system, a color coat may be applied after preparation.
This approach is most practical for a sound panel being scuffed and refinished, not for a damaged spot that has been sanded through multiple layers. The surface still needs to be dull, clean, smooth, and free of wax, silicone, grease, and loose coating.
Some automotive products are designed as direct-to-metal coatings or primer-sealers with specific application purposes. That does not mean any paint can be sprayed onto bare steel. The product label must specifically identify the substrate and intended use.
Primer may also be unnecessary when an existing compatible sealer is already intact and the repair does not expose a different material. However, using primer is often the safer choice when the surface history is unknown or the repair includes filler and several substrate transitions.
Choosing the Right Primer for the Surface
The word “primer” covers several different products. Choosing by color alone is a common mistake; the important factors are the substrate, the repair size, the paint system, and the level of protection required.
Epoxy primer
Epoxy primer provides strong adhesion and useful moisture resistance over properly prepared metal. It is frequently selected for bare steel and larger repairs where corrosion protection is important.
It is generally not a filler. Surface imperfections may remain visible, so bodywork and sanding still need to be completed. Some epoxy products can be applied over other substrates, but the manufacturer’s instructions determine whether that combination is acceptable.
Self-etching primer
Self-etching primer contains chemicals that help it bond to certain bare metals. It is often used for small exposed areas, but it is not a universal rust barrier or a substitute for removing corrosion.
Self-etching products may have limitations over body filler, old paint, or certain primers. Applying incompatible layers can cause lifting, wrinkling, or poor adhesion, so the recoat instructions matter.
High-build primer surfacer
High-build primer is designed to fill minor sanding marks and provide material that can be block-sanded level. It is useful after body filler and during preparation for a smooth color coat.
Because it is thicker than ordinary primer, heavy applications can sag, trap solvents, or remain soft underneath. Apply several controlled coats and allow sufficient flash and cure time before sanding.
Sealer
Primer-sealer creates a more uniform surface and can help prevent differences in absorption or color between old paint, filler, and primer. It is especially useful before a basecoat when the repair contains several materials or when color coverage needs a consistent ground.
A sealer is not necessarily the same as a corrosion-protective primer. It may be the final preparation layer rather than the first coating over exposed metal.
Aerosol primer
Spray-can primer can work for small chips, trim pieces, and limited touch-ups when the product is intended for automotive use. It is less forgiving on large panels because overspray, uneven film thickness, and poor atomization can become visible.
Many consumer aerosol products are not equivalent to professional two-component coatings. They may provide adequate short-term preparation for a small repair, but the label’s limitations should guide expectations.
How to Prepare a Surface Before Priming
Preparation usually determines more of the final result than the primer itself. A carefully applied primer cannot bond to contamination or stabilize a weak layer underneath.
- Wash the area. Remove road film, dirt, and water-soluble contamination with an appropriate automotive cleaner. Let the surface dry completely.
- Remove defects. Sand away loose paint, flaking edges, and corrosion. Do not seal bubbling rust beneath new material.
- Shape the repair. Apply and sand body filler as needed, keeping the transition gradual rather than creating a sharp ridge.
- Scuff sound paint. Glossy old paint needs a uniform dull finish so the new coating can grip.
- Degrease carefully. Use a compatible wax-and-grease remover and clean lint-free towels. Avoid touching the prepared surface with bare hands.
- Control dust. Blow away or remove sanding residue without spreading oil or moisture onto the panel.
- Mask surrounding areas. Protect glass, rubber, wheels, handles, and adjacent panels from overspray.
Do not use household detergents, silicone-containing products, or oily polishes immediately before painting. Contamination can cause fish eyes, craters, adhesion loss, or uneven wetting.
Applying Primer Without Creating New Problems
Read the product instructions before spraying. They specify the recommended surface, mixing ratio if applicable, nozzle distance, temperature range, flash time, sanding requirements, and compatible topcoats.
Use light, even passes rather than trying to cover the repair in one wet coat. Overlapping each pass consistently helps prevent dry spray on one side and runs on the other.
Allow each coat to flash according to the label. Flash time lets solvents escape before another layer is applied; rushing this step can trap solvent and produce wrinkling, bubbling, softness, or later shrinkage.
After the primer cures, inspect it under strong, angled light. Sand runs and roughness, and use a guide coat when leveling a larger repair. If sanding exposes metal or filler again, spot-prime those areas as required rather than covering an uneven repair with color.
Primer should finish as a smooth, continuous surface. It does not have to look perfect immediately, but it should not contain pinholes, deep scratches, dust clumps, or visible repair edges before basecoat application.
Safety and Compatibility Limitations
Automotive primers can contain solvents and other hazardous chemicals. Work in a well-ventilated area, keep the product away from flames and ignition sources, and use the personal protective equipment specified by the safety information for that product.
A basic disposable dust mask is not automatically adequate for solvent vapor. Professional two-component, or 2K, products can present significant inhalation hazards, including exposure to isocyanates. Spraying them requires appropriate respiratory protection, ventilation, and a controlled setup; some home garages are not suitable.
Never assume that products from different brands or coating families can be layered safely. Lacquer, enamel, acrylic, urethane, epoxy, and waterborne systems may have different recoat and curing requirements.
Test an inconspicuous area when the old finish is uncertain. If the surface wrinkles, softens, lifts, or becomes sticky, stop rather than burying the reaction under more material.
Signs a Professional Repair Is the Better Choice
Small chips and isolated cosmetic repairs can be manageable with careful preparation. Professional help becomes more appropriate when the damage involves structural panels, widespread rust, multiple layers of failing paint, or a large color-matching area.
Seek experienced assistance if a panel is badly dented, corrosion has perforated the metal, or the coating is peeling beyond the visible repair. A professional can also identify unknown factory finishes and use a controlled spray environment for better dust control and color blending.
Color matching is another limitation. Primer may improve coverage, but it cannot make an incorrect basecoat color match the surrounding paint. Faded finishes, metallic particles, pearl effects, and changes in gloss often require blending beyond the repaired spot.
How to Decide Whether Your Repair Needs Primer
Start by identifying the deepest exposed material. If you see bare metal, body filler, plastic, or a powdery layer, plan on using the appropriate primer or adhesion product.
If the repair remains entirely within a stable, sanded factory finish, primer may be optional. The decision becomes less certain when the paint is old, poorly bonded, contaminated, or from an unknown coating system.
- Use metal primer over clean exposed steel or aluminum when the product is approved for that substrate.
- Use primer surfacer over properly cured filler and sanding repairs that need leveling.
- Use plastic adhesion promoter on compatible plastic parts before the recommended primer or paint.
- Use sealer when different surfaces need a uniform foundation before color.
- Skip a separate primer only when the existing finish is sound, compatible, clean, and properly scuffed—or when a labeled direct-to-surface system specifically allows it.
When uncertain, inspect the edge of the repair rather than judging only the center. That edge often reveals whether the new coating will be applied over metal, filler, old primer, clearcoat, or a mixture of all four.
Conclusion: Primer Is a Surface-Specific Decision
Do you need primer for car paint? You generally do when painting bare metal, filler, plastic, repaired areas, or surfaces needing corrosion protection and leveling. You may not need it over intact, compatible factory paint that has been thoroughly cleaned and scuffed.
The major limitation is that primer cannot fix active rust, poor preparation, incompatible coatings, or unsafe spraying conditions. Identify the exposed substrate, choose a product made for it, follow the recoat instructions, and get professional help when corrosion or large-area refinishing exceeds a simple touch-up.