How to Install a Battery Kill Switch: Step-by-Step DIY Guide
A battery kill switch is a simple device that can disconnect a vehicle’s battery from its electrical system with the turn of a knob or switch. It is commonly used on vehicles that sit unused for long periods, classic cars, race cars, project vehicles, RVs, boats, and other equipment where disconnecting battery power is useful.
A properly installed battery kill switch can help reduce battery drain while a vehicle is stored and can provide a convenient way to disconnect electrical power. It can also make a vehicle more difficult to start when the switch is turned off, although it should not be treated as a complete anti-theft system.
Installing one may look simple, but the battery can deliver very high current. A poorly rated switch, undersized cable, loose terminal, or incorrectly routed wire can create resistance, excessive heat, sparks, or electrical problems. Modern vehicles can also react differently when battery power is disconnected because electronic modules may lose stored settings or require reinitialization.
In this guide, I’ll explain how to install a battery kill switch, where to place it, how positive- and negative-side installations differ, what tools you need, how to test the finished installation, and what mistakes to avoid.
What Is a Battery Kill Switch?
A battery kill switch, also called a battery disconnect switch or battery cutoff switch, is a device used to interrupt the electrical connection between a vehicle’s battery and its electrical system.
How a Battery Kill Switch Works
A vehicle’s battery supplies electrical power through a circuit. When the kill switch is in the ON position, the circuit remains connected and the vehicle can use battery power normally.
When the switch is turned OFF, the switch opens the circuit and interrupts the intended battery connection.
The exact result depends on how the switch is installed. A simple disconnect may isolate most of the vehicle’s electrical system, while some installations can leave specific circuits connected.
Battery Disconnect vs. Battery Kill Switch
These terms are often used interchangeably.
A battery disconnect switch generally refers to any device designed to interrupt battery power.
A battery kill switch usually refers to a manually operated cutoff used to shut down or isolate electrical power.
A battery isolator is different. It is normally used to manage power between multiple batteries rather than simply disconnecting one battery from the vehicle.
Where Is a Battery Kill Switch Normally Installed?
A kill switch can be installed on either the positive or negative side of the battery circuit, depending on the switch design and application.
A simple negative-side installation is common in some DIY applications because the negative cable is connected to vehicle ground. Positive-side installations are also used, particularly where the switch design or application calls for it.
The correct location is ultimately determined by the switch manufacturer’s instructions, the vehicle’s electrical design, and the intended use.
Why Install a Battery Kill Switch?
There are several practical reasons to install one.
Prevent Battery Drain
A battery can slowly discharge while a vehicle is parked because various electrical systems may continue drawing current.
Disconnecting the battery can eliminate many of those loads while the vehicle is stored.
This can be useful for vehicles that are driven only occasionally.
Improve Vehicle Security
A disconnected battery can make the vehicle more difficult to start because the normal electrical supply is interrupted.
However, a battery kill switch is not a complete anti-theft device. A determined thief may bypass it or use another method of accessing the vehicle.
Think of it as an additional deterrent rather than a complete security system.
Protect a Vehicle During Storage
Battery disconnects are particularly useful for:
- Classic cars
- Project vehicles
- Seasonal vehicles
- RVs
- Boats
- Trailers
- Rarely used trucks
- Off-road vehicles
If a vehicle sits unused for weeks or months, disconnecting the battery can reduce unnecessary battery drain.
Emergency Electrical Shutoff
Some specialty and motorsport applications use battery cutoff systems for emergency electrical isolation.
However, race-car installations are not necessarily the same as street-car installations. Competition vehicles may require an externally accessible cutoff and specific wiring arrangements.
Types of Battery Kill Switches
Battery switches come in several designs.
Knife-Blade Battery Disconnect
A knife-blade switch mounts directly at or near the battery terminal.
It is simple and inexpensive, making it popular for storage vehicles and some older applications.
Its main limitation is that physical placement may be less convenient, and the exposed design may not be ideal for every engine compartment.
Rotary Battery Kill Switch
A rotary switch uses a knob that can be turned between ON and OFF positions.
This style is common in automotive, recreational, marine, and racing applications.
A rotary switch can be installed close to the battery or remotely with suitable cables.
Heavy-Duty Battery Disconnect
Heavy-duty switches are designed to handle the high current demands associated with vehicle starting and other electrical loads.
They are appropriate for applications where a small terminal-mounted switch would not provide sufficient capacity.
Remote Battery Disconnect
A remote switch allows the battery circuit to be controlled from a separate location.
This can be useful when the battery is difficult to access or when convenient cabin-mounted control is desired.
Positive-Terminal Kill Switch
This switch interrupts the positive battery cable.
It can be effective when properly installed, but the positive terminal remains electrically live from the battery side, so careful installation is particularly important.
Negative-Terminal Kill Switch
This switch interrupts the negative battery connection.
It is a common choice for simple installations and can be convenient because disconnecting the negative side breaks the circuit between the battery and vehicle ground.
Racing Battery Cut-Off Switch
A racing cutoff switch is designed for motorsport applications and may need to perform more than simply disconnecting the battery.
Some race setups are designed to shut down the electrical system and prevent the engine from continuing to run from alternator output after the battery is disconnected.
That is a specialized application and should be installed according to the relevant racing rules and switch instructions.
Should a Battery Kill Switch Go on the Positive or Negative Terminal?
This is one of the most common questions.
Installing on the Negative Cable
A negative-side installation places the switch in the negative battery connection.
Conceptually, the arrangement is:
Battery negative → Kill switch → Vehicle ground
One advantage is that disconnecting the negative side isolates the vehicle ground connection from the battery.
When the battery is already disconnected, accidental contact between a grounded part of the vehicle and the disconnected negative terminal is less likely to create a battery short than a similar situation involving the positive terminal.
Installing on the Positive Cable
A positive-side installation places the switch in the main positive battery circuit:
Battery positive → Kill switch → Vehicle positive cable
This can also work correctly when the switch is designed and rated for the application.
However, the battery positive side should always be treated as energized until the battery itself has been properly disconnected.
Which Location Is Best?
There is no universal answer for every vehicle.
For a simple storage-oriented DIY installation, a negative-side disconnect can be straightforward.
For a specific vehicle or high-current application, the correct location may be determined by the switch design, wiring arrangement, manufacturer instructions, and any applicable vehicle or competition requirements.
Important Exception: Motorsport and Race Vehicles
Do not assume that a simple street-car disconnect is suitable for a race car.
Motorsport regulations may specify the type of cutoff switch, its location, accessibility from outside the vehicle, and the way the electrical system and alternator are isolated.
Always follow the applicable rules for the specific competition class.
What You Need to Install a Battery Kill Switch
The required parts depend on the switch style.
Required Parts
You may need:
- Battery kill switch
- Appropriate battery cable
- Cable terminals or lugs
- Terminal hardware
- Mounting hardware
- Cable protection
Some terminal-mounted disconnects require very little additional wiring, while remote switches may require longer heavy-gauge cables.
Basic Tools
Common tools include:
- Socket set
- Combination wrenches
- Screwdrivers
- Multimeter
- Cable cutter, if required
- Heavy-duty cable crimper, if adding cable ends
Optional Tools
Useful extras include:
- Heat-shrink tubing
- Electrical insulation
- Cable ties
- Protective wire loom
- Terminal cleaning brush
- Electrical contact cleaner where appropriate
Safety Equipment
Use:
- Protective gloves
- Safety glasses
Avoid wearing loose metal jewelry while working around a vehicle battery.
How to Choose the Right Battery Kill Switch
Do not select a kill switch based only on price or physical size.
Check the Electrical Rating
The switch needs to handle the vehicle’s electrical requirements.
Starting a vehicle can require a very high current, particularly with a large engine, diesel engine, high-compression engine, or demanding electrical system.
The switch must have an appropriate continuous and starting-current rating.
Match the Switch to the Vehicle
Consider:
- Engine size
- Starter requirements
- Charging system
- Electrical accessories
- Battery voltage
- Vehicle type
A switch designed for a small utility application should not automatically be assumed suitable for a high-current vehicle starting circuit.
Consider Physical Size
Make sure there is enough room for the switch and cable routing.
A switch that technically meets the electrical requirements is still a poor choice if it cannot be mounted securely.
Consider Installation Location
Think about whether the switch will be:
- Under the hood
- Near the battery
- Inside the cabin
- Near the trunk-mounted battery
- Externally accessible
The environment should influence your choice.
Choose a Switch With Proper Terminals
The terminal configuration must match the cable and connector system you plan to use.
Connections should be mechanically secure and electrically sound.
Consider Environmental Protection
If the switch will be exposed to moisture, dust, vibration, or engine heat, choose a design appropriate for that environment.
Manual vs. Remote Switching
Manual switches are simple and generally easier to troubleshoot.
Remote switches are convenient but introduce additional wiring and components, so there are more potential points of failure.
Street Vehicle vs. Race Vehicle
A street vehicle may need a simple storage disconnect.
A race vehicle may require a dedicated cutoff system with additional electrical functionality.
Do not treat these as interchangeable applications.
Battery Kill Switch Installation Safety
Battery work deserves caution because a vehicle battery can deliver enough current to cause severe short circuits and rapidly heat metal objects.
Park the Vehicle Safely
Before beginning:
- Turn the engine off.
- Remove the ignition key.
- Turn off electrical accessories.
- Park on a stable surface.
- Secure the vehicle.
Disconnect the Battery Correctly
For a conventional negative-ground vehicle, the negative terminal is normally disconnected before the positive terminal during battery removal.
When installing a switch, follow the installation instructions for the specific design and vehicle.
The objective is to prevent accidental short circuits while working.
Avoid Short Circuits
A metal wrench can become extremely hot if it bridges a battery terminal and grounded metal.
Keep tools controlled and avoid allowing a conductive tool to contact both points simultaneously.
Be Careful With Modern Vehicles
Disconnecting the battery can affect:
- Radio presets
- Clock settings
- Security systems
- Power-window initialization
- Electronic module memory
- Some learned vehicle settings
Some vehicles may also require specific procedures after battery reconnection.
Never Work on an Unstable Electrical Setup
If the battery cables are badly corroded, damaged, loose, or overheated, repair the underlying problem before installing a disconnect switch.
A kill switch should not be used to hide an unsafe electrical system.
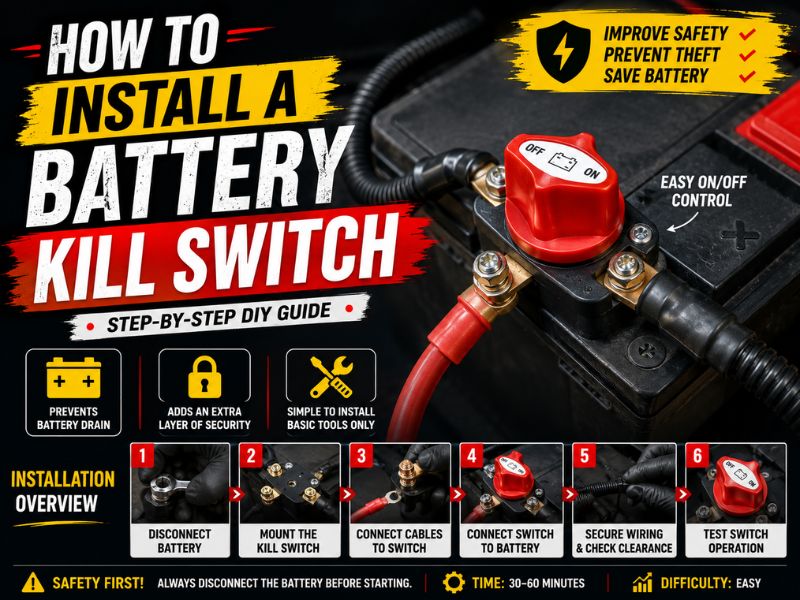
How to Install a Battery Kill Switch Step by Step
The following process describes a typical manual battery disconnect installation. Always prioritize the instructions supplied with your specific switch.
Step 1: Turn Off the Vehicle
Turn off the engine and all electrical accessories.
Remove the ignition key or key fob from the immediate area when appropriate.
Allow any electrical systems that remain active after shutdown to complete their normal shutdown process.
Step 2: Locate the Battery
Identify the battery and determine where the switch will be installed.
Some vehicles have the battery under the hood, while others place it in the trunk, under a seat, or in another compartment.
Make sure there is enough space for the switch and the necessary cable routing.
Step 3: Inspect the Battery Cables
Check the existing cables for:
- Corrosion
- Damaged insulation
- Frayed strands
- Heat damage
- Loose terminals
If a cable is already damaged, replace or repair it before relying on a battery disconnect.
Step 4: Disconnect the Battery
Disconnect the battery following the proper procedure for the switch installation and vehicle.
For many conventional negative-ground systems, disconnecting the negative terminal first is the standard practice.
Once the connection is removed, keep the disconnected cable from accidentally touching the terminal again.
Step 5: Mount the Kill Switch
Choose a secure location.
The switch should:
- Be firmly supported
- Avoid excessive engine heat
- Avoid moving components
- Remain accessible
- Avoid direct exposure to unnecessary water or contamination
For remote mounting, ensure the cable route is practical before securing the switch permanently.
Step 6: Connect the Battery Cable to the Switch
Follow the switch’s terminal markings.
If the switch has clearly labeled battery and load terminals, connect the appropriate side of the cable to each one.
Use the correct cable size and terminal type.
Step 7: Connect the Switch to the Battery
Complete the other side of the circuit.
Double-check that the cable routing and polarity are correct before tightening the connections.
Step 8: Secure and Protect the Wiring
Prevent the cable from:
- Rubbing against sharp metal
- Touching exhaust components
- Getting close to belts or pulleys
- Hanging loosely
- Bending excessively at the terminal
Use protective loom, clamps, or suitable fasteners where necessary.
Step 9: Turn the Switch On
Once everything is connected and inspected, turn the switch to the ON position.
Do not immediately assume the installation is correct. Observe for abnormal behavior.
If there is unusual sparking, smoke, significant heat, or a burning smell, turn the system off and stop the test.
Step 10: Test the Vehicle
Check:
- Interior lights
- Dashboard electronics
- Exterior lighting
- Audio system
- Other major accessories
Then start the engine.
If the starter behaves normally and the electrical system functions correctly, the switch is likely carrying the required current.
Step 11: Turn the Switch Off and Verify the Disconnect
Turn the switch to OFF.
Check whether the vehicle’s intended electrical power has been disconnected.
Some circuits may remain powered depending on how the system is wired, so do not assume every vehicle circuit must go completely dead.
How to Wire a Battery Kill Switch
The wiring depends on where the switch is installed.
Simple Negative-Side Installation
The basic concept is:
Battery Negative → Kill Switch → Vehicle Ground
The switch interrupts the connection between the battery negative terminal and the vehicle’s ground system.
This is a relatively straightforward arrangement for many simple applications.
Positive-Side Installation
The basic concept is:
Battery Positive → Kill Switch → Main Vehicle Positive Cable
The switch interrupts the main positive path.
Because the battery positive side remains electrically live on the battery side of the switch, extra care is required during installation.
Why Cable Size Matters
The starter can draw very high current.
A cable that is too small can create:
- Voltage drop
- Excessive resistance
- Heat
- Poor starter performance
- Potential electrical damage
Cable size should be selected based on current demand, cable length, vehicle requirements, and the switch manufacturer’s specifications.
Why Terminal Connections Matter
A loose or poorly crimped terminal increases electrical resistance.
That resistance can become significant under heavy load and may create localized heating.
A proper mechanical connection is just as important as selecting the correct switch.
How to Install a Battery Kill Switch Without Cutting the Battery Cable
Not every installation requires you to cut the existing battery cable.
Terminal-Mounted Kill Switches
Some battery disconnects are designed to install directly at the battery terminal.
The switch becomes part of the terminal connection and can be operated without adding a long cable run.
Advantages
This type of installation may offer:
- Minimal modification
- Simple installation
- Easy removal
- Convenient battery access
Limitations
Terminal-mounted switches can have limitations regarding:
- Current capacity
- Available space
- Accessibility
- Compatibility with certain battery terminals
For demanding applications, a heavy-duty remote switch with properly sized cable may be more suitable.
Where Should You Mount a Battery Kill Switch?
Location depends on the purpose of the installation.
Under the Hood
This is convenient when the main goal is battery isolation during storage.
The switch should be protected from excessive heat and positioned where it cannot interfere with moving components.
Inside the Cabin
A cabin-mounted switch provides convenient access.
It may be useful if the vehicle is frequently disconnected or if the battery itself is difficult to reach.
However, routing heavy battery cables into the cabin requires careful protection and secure mounting.
Near the Battery
Keeping the switch close to the battery can reduce cable length and simplify the installation.
This is often practical for storage vehicles.
Through the Firewall
If heavy-gauge cables pass through a firewall, they must be protected against abrasion.
Use an appropriate grommet or protective pass-through.
Never allow a battery cable to rub directly against a sharp metal opening.
External Mounting for Race Cars
Race vehicles may use externally accessible cutoff switches so emergency personnel can isolate power quickly.
The exact configuration should comply with the rules governing the vehicle.
How to Install a Remote Battery Kill Switch
A remote disconnect uses a switch or control system that allows the battery circuit to be interrupted from a different location.
What Is a Remote Battery Disconnect?
Instead of mounting the main disconnect directly beside the battery, the system allows remote operation.
This can be useful when the battery is located in an inaccessible area.
When Is Remote Switching Useful?
Typical applications include:
- Race cars
- Boats
- RVs
- Utility equipment
- Vehicles with trunk-mounted batteries
- Fleet equipment
Basic Wiring Concept
The main battery current still needs to pass through an appropriately rated switching device or contactor.
The remote control usually operates that switching mechanism rather than carrying the full starter current itself.
Choosing the Correct Remote Switch
Check:
- Voltage
- Continuous current
- Starting current
- Duty cycle
- Environmental rating
- Cable requirements
Do not confuse a small control relay with a heavy-current battery disconnect.
Testing the Remote System
After installation, verify that:
- The remote command activates the disconnect.
- The vehicle receives power when the switch is ON.
- Power is interrupted when the switch is OFF.
- No component becomes excessively hot.
- The system does not behave intermittently.
How to Test a Battery Kill Switch After Installation
Testing should be part of every installation.
Visual Inspection
Check that:
- All connections are tight.
- No terminals are exposed unnecessarily.
- Cables are secured.
- Insulation is intact.
- The switch is firmly mounted.
Test the Switch With a Multimeter
A multimeter can help verify whether the switch is electrically connected in the ON position and open in the OFF position.
The exact test depends on the switch configuration.
Check Battery Voltage
Measure battery voltage before and after the installation if needed.
A sudden abnormal voltage reading can indicate a connection or battery problem rather than a switch problem.
Verify Starting Operation
Start the vehicle after the switch is turned ON.
The starter should operate normally.
If the engine cranks slowly or not at all, inspect the switch connections and cable sizing.
Verify Electrical Shutoff
Turn the switch OFF and check the circuits that the installation is intended to isolate.
Remember that some vehicle circuits may have separate power paths.
Check for Excessive Heat
After operating the vehicle, inspect the switch and terminals for unusual heat.
A warm component may indicate resistance, overload, or poor connection.
A properly rated switch and correctly installed cable should not become dangerously hot under normal operation.
Check for Loose Connections
Vibration can expose weak connections quickly.
Recheck the hardware after the initial test and again after some operating time.
Common Battery Kill Switch Installation Mistakes
Installing a Switch With an Insufficient Current Rating
A switch that cannot handle the starter and vehicle loads is a poor choice.
The switch may overheat or fail.
Connecting the Wrong Terminals
Some switches have dedicated battery and load terminals.
Reverse or incorrect connections can cause improper operation.
Using Undersized Cable
Small cable may not safely carry starting current.
Leaving Connections Loose
Loose connections increase electrical resistance and can generate heat.
Mounting the Switch Near Excessive Heat
Exhaust components and very hot engine areas are poor locations.
Allowing Cables to Rub Against Metal
Abrasion can eventually damage insulation and create a short circuit.
Installing the Switch Without Considering Modern Electronics
Battery interruption may reset electronic settings or create a need for reinitialization.
Treating a Kill Switch as a Complete Anti-Theft Device
It is not.
A battery disconnect is only one additional security measure.
Forgetting That Some Vehicles May Require Reinitialization
Power windows, clocks, audio systems, and other modules may need to be reset after battery reconnection.
Using a Racing-Style Installation on a Street Vehicle Without Understanding the Requirements
A race-specific cutoff may have features and wiring requirements that are unnecessary or unsuitable for a normal road car.
What Happens When You Turn Off a Battery Kill Switch?
Turning the switch OFF interrupts the battery connection that the switch controls.
Electrical Power Is Interrupted
Many vehicle systems will lose battery power.
This may include:
- Interior electronics
- Lighting
- Audio
- Certain control modules
- Alarm-related circuits
The exact result depends on the wiring.
Battery Drain May Be Reduced
If the switch disconnects the circuits responsible for parasitic draw, battery discharge during storage can be significantly reduced.
However, the switch does not repair the underlying electrical problem causing the drain.
Vehicle Memory May Be Lost
Depending on the vehicle, you may lose:
- Clock settings
- Radio presets
- Learned settings
- Window calibration
- Other stored information
Modern Vehicles May Behave Differently
Electronic control modules can require time to relearn certain operating parameters after battery power is restored.
Vehicle-specific procedures should be followed when necessary.
Can You Use a Battery Kill Switch While the Engine Is Running?
For a normal vehicle, do not assume you can safely turn a simple battery disconnect OFF while the engine is running.
The alternator and electrical system are designed to operate as a system. Interrupting battery connection during operation can cause electrical disturbances and may damage components depending on the vehicle and switch arrangement.
Some specialized racing cutoff systems are specifically designed to handle the electrical system in a way that allows the engine and alternator to shut down correctly.
That is different from simply installing a basic battery disconnect.
Does a Battery Kill Switch Prevent Battery Drain?
It can help, but it is important to understand what it can and cannot do.
When It Can Help
A battery disconnect can be useful when:
- The vehicle is stored for a long time.
- Parasitic electrical loads are present.
- The vehicle has a simple electrical system.
- You need a convenient way to isolate the battery.
What It Cannot Fix
A kill switch does not repair:
- A weak battery
- A failing alternator
- Damaged wiring
- Faulty electrical components
- Excessive parasitic draw
If the battery dies repeatedly while the vehicle is in normal use, diagnose the charging and electrical systems instead of simply hiding the problem with a disconnect switch.
Battery Disconnect vs. Battery Maintainer
A battery disconnect removes electrical loads.
A battery maintainer actively keeps the battery charged at an appropriate level.
For a vehicle stored in a garage with access to safe electrical power, a suitable maintainer may be more practical for maintaining battery state of charge.
Battery Kill Switch vs. Battery Disconnect vs. Battery Isolator
These terms are sometimes confused.
Battery Kill Switch
A manually operated device designed to interrupt battery power.
Battery Disconnect
A broader term that includes different types of battery isolation switches.
Battery Isolator
Usually used to manage charging and electrical flow between multiple batteries.
It is not simply a replacement for a manual kill switch.
Battery Cutoff for Racing
A racing cutoff is designed for rapid electrical shutdown and may have additional requirements related to alternator output and emergency operation.
Can a Battery Kill Switch Damage a Car?
A properly selected and correctly installed switch should not damage a vehicle during normal use.
Problems generally arise from installation mistakes or incompatibility.
Possible Issues
These may include:
- Lost electronic memory
- Poor electrical connections
- Excessive resistance
- Overheated cables
- Switch failure
- Electrical disturbances
- Improper racing-system wiring
How to Reduce Risk
Use the correct switch, correctly sized cables, secure terminals, appropriate mounting, and the manufacturer’s installation procedure.
For modern vehicles, check whether the manufacturer specifies any precautions for battery disconnection.
How to Maintain a Battery Kill Switch
The switch itself should be inspected periodically.
Inspect the Terminals
Look for:
- Corrosion
- Looseness
- Discoloration
- Heat damage
Check Cable Tightness
Vibration can loosen connections over time.
Look for Corrosion
Corrosion can increase electrical resistance and reduce reliability.
Inspect for Heat Damage
Any melted insulation, discoloration, or unusual heat deserves investigation.
Keep the Switch Clean
Dirt and moisture can affect mechanical operation, particularly for exposed switches.
Test the Switch Periodically
Operate the switch during normal maintenance.
If it feels inconsistent, becomes difficult to turn, or intermittently loses connection, inspect or replace it.
Battery Kill Switch Installation for Different Vehicles
The basic concept is similar across applications, but the electrical requirements are not identical.
Cars and Trucks
A properly rated manual disconnect can be useful for storage or specific electrical isolation needs.
Modern electronics should be considered before installation.
Classic Cars
Classic vehicles often have simpler electrical systems, making battery disconnects particularly convenient for storage.
However, the vehicle’s original wiring should still be inspected for age-related deterioration.
RVs
RVs may have multiple batteries and separate chassis and house electrical systems.
A simple chassis battery kill switch may not isolate every electrical load.
Boats
Marine environments require switches designed for moisture, corrosion, and vibration.
Use equipment specifically rated for the marine application.
Motorcycles
Motorcycle battery disconnect solutions are often smaller, but the switch still needs to match the electrical system.
Off-Road Vehicles
Vibration, water, dust, and mud make environmental protection especially important.
Race Cars
Race vehicles require particular attention to emergency accessibility, current capacity, alternator behavior, and competition regulations.
Expert Troubleshooting Section
If the battery kill switch does not behave as expected, start with the simplest possibilities.
Kill Switch Does Not Disconnect Power
Possible causes include:
- Wrong terminal connection
- Incorrect wiring
- A bypass circuit
- Faulty switch
- Another battery or power source
Check the wiring diagram and identify whether another circuit is still supplying power.
Vehicle Will Not Start After Installation
Check:
- Battery terminal connections
- Switch terminals
- Cable size
- Cable routing
- Ground connections
- Corrosion
- Switch position
If the starter does not engage, the problem may be a poor connection rather than a faulty battery.
Switch Gets Hot
Excessive heat should not be ignored.
Possible causes include:
- Undersized switch
- Undersized cable
- Loose connection
- Excessive resistance
- Electrical overload
Turn the system off and identify the cause before continuing to use the vehicle.
Sparks Occur During Installation
A small spark can occur under certain conditions when reconnecting a battery because some vehicle circuits may immediately draw current.
However, significant sparking, repeated arcing, smoke, or rapidly heating components is a reason to stop.
Inspect the wiring for an unintended short or incorrect connection.
Battery Still Drains With Switch Off
Possible explanations include:
- The switch does not isolate every circuit.
- Another battery is connected.
- Some circuits bypass the switch.
- The switch is faulty.
- There is an unexpected electrical connection.
If battery drain continues, use a proper parasitic-draw diagnostic procedure rather than assuming the switch itself is the only issue.
Frequently Asked Questions About Battery Kill Switches
What does a battery kill switch do?
It interrupts the battery connection to the vehicle’s electrical system. Depending on the installation, it can isolate most or all of the vehicle’s electrical loads.
Is it better to put a kill switch on positive or negative?
Either can be correct when properly designed and installed. A negative-side disconnect is common for simple applications, while positive-side installations are also used. Follow the switch manufacturer’s instructions and the requirements of the specific vehicle.
Can I install a battery disconnect switch myself?
Yes, a straightforward manual installation can be a reasonable DIY project if you understand basic electrical safety and use a switch and cables correctly rated for the vehicle.
Does a battery kill switch stop battery drain?
It can reduce or eliminate battery drain from circuits that the switch disconnects. It does not repair a weak battery, charging problem, or electrical fault.
Will a battery kill switch reset my car’s computer?
It can affect stored information and learned settings in some modern vehicles. The exact consequences vary by vehicle.
Can a battery kill switch prevent theft?
It can act as an additional deterrent because the vehicle may not start normally when the battery is disconnected. It is not a complete anti-theft system.
Can I turn a battery kill switch off while driving?
Do not do this with a basic battery disconnect unless the specific system is designed for safe operation while the engine is running.
What size battery kill switch do I need?
Choose a switch based on the vehicle’s voltage, starting current, continuous electrical load, cable size, and the manufacturer’s rating requirements.
Where should a battery disconnect switch be mounted?
Choose a location that is secure, accessible, protected from excessive heat and moisture, and suitable for safe cable routing.
Can I install a kill switch without cutting the battery cable?
Yes. Some terminal-mounted switches are designed to install directly at the battery terminal without cutting the existing cable.
Does a battery kill switch affect the alternator?
A conventional disconnect may interrupt the normal battery connection, so operating it while the engine is running can create problems depending on the vehicle and system design. Specialized racing systems can be designed differently.
How do I know if my battery kill switch is working?
Check that the vehicle receives power consistently when the switch is ON and that the intended circuits lose power when it is OFF. A multimeter can also be used to verify continuity through the switch.
Final Verdict: How to Install a Battery Kill Switch
Installing a battery kill switch is not difficult when the correct switch, cable, mounting location, and wiring configuration are used.
The basic process is:
Choose the correct switch → determine the appropriate installation location → turn the vehicle off → disconnect the battery safely → mount the switch → connect correctly sized cables → secure the wiring → restore power → test the system.
For a simple storage vehicle, a properly rated negative-side disconnect can be a convenient solution. For high-current applications, remote systems, multiple-battery vehicles, and race cars, the electrical design becomes more specialized.
The most important considerations are current capacity, cable size, secure terminals, insulation, and proper mounting. A kill switch should never be treated as a substitute for diagnosing a weak battery or electrical fault.
Also remember that modern vehicles contain numerous electronic systems. Disconnecting the battery can erase stored settings or require reinitialization, so check the vehicle’s specific requirements before installation.
Finally, do not rely on a battery kill switch as your only security measure. Its primary function is electrical isolation. When it is correctly installed and maintained, it can be a practical way to disconnect battery power, especially during vehicle storage.