
Fix a Cracked Bumper Fast and Easy With Zip Ties (Drifters’ Stitch)
You can repair many cracked plastic bumper covers quickly with zip ties by aligning the crack, drilling matching holes on both sides, and lacing the zip ties across the damage like stitches. This can hold the bumper cover together, but it should not be treated as a repair for damaged crash structures, sensors, or critical mounting points.
The technique is often called a drifters’ stitch, drift stitch, zip-tie stitch, or Frankenstein stitch. It is popular because it is inexpensive, requires only basic tools, and can stabilize a cracked bumper without a full refinishing job.
It also creates a deliberately visible DIY appearance that is common on drift cars and project vehicles. For a cleaner or more factory-like repair, plastic welding, repair adhesive, or bumper replacement may be better.
What Is a Drifters’ Stitch Bumper Repair?
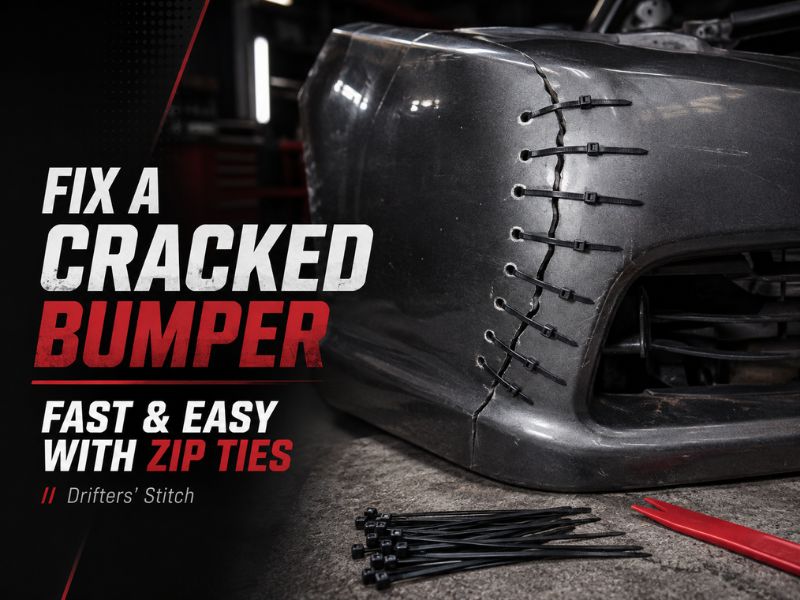
A drifters’ stitch uses small holes drilled on both sides of a bumper crack. Zip ties are threaded through the holes and tightened to pull the broken edges together.
Think of it like stitching a cut in fabric, except the bumper plastic is being mechanically held together rather than sewn.
The method can:
- Pull separated edges back into alignment
- Reduce movement around the crack
- Keep part of a bumper cover from hanging loose
- Slow further separation of an existing crack
However, the zip ties do not melt or chemically bond the plastic.
They hold the broken sections together mechanically; they do not restore the bumper cover to one continuous piece of plastic.
Is It Safe to Fix a Bumper With Zip Ties?
It depends on what is damaged.
A vehicle’s visible plastic bumper cover is only one part of the bumper system.
A zip-tie stitch may be reasonable for:
- Cosmetic bumper-cover cracks
- Small non-structural splits
- Tears where both edges remain intact
- Project or drift cars
- Temporary repairs
It should not be relied on to repair:
- Damaged crash reinforcement
- Crushed energy absorber
- Critical mounting structure
- Parking-sensor mounts
- Radar or ADAS mounting areas
- Major collision damage
If the bumper is loose enough that it could fall into a tire, contact the road, or detach while driving, a more secure repair is necessary.
What Parts Are Behind the Bumper Cover?
The part you see from outside is usually the bumper cover.
Behind it may be:
- Energy-absorbing foam or plastic
- Reinforcement beam
- Mounting brackets
- Wiring harnesses
- Parking sensors
- Fog-light wiring
- Cameras
- Radar modules
This is why you should never start drilling simply because you can see the crack from outside.
Inspect what is behind the proposed drill locations whenever possible.
What Cracks Work Best With Zip-Tie Stitching?
The method works best when both sides of the crack are still present and can be pushed back into their approximate original position.
Good candidates include:
- Straight bumper-cover cracks
- Lower bumper splits
- Tears along flexible sections
- Small cracks near non-critical areas
Poor candidates include:
- Missing pieces of plastic
- Shattered bumper sections
- Severely deformed plastic
- Cracks through important mounts
- Very brittle plastic
- Damage around safety sensors
If the material cannot be aligned without extreme force, zip ties may simply pull new holes through the weakened plastic.
What You Need
A basic zip-tie bumper repair may require:
- Quality zip ties
- Drill
- Small drill bit
- Marker
- Ruler or measuring tape
- Painter’s tape
- Side cutters
- Gloves
- Eye protection
Depending on the job, you may also use:
- Plastic repair adhesive
- Hot staples
- Plastic-welding equipment
- Backside reinforcement
Choose zip ties that fit the repair without requiring unnecessarily large holes.
Step 1: Inspect the Damage Before Drilling
Before touching the drill, inspect the front and back of the bumper if possible.
Look for:
- Electrical wiring
- Sensors
- Brackets
- Fog-light housings
- Reinforcement components
- Hidden cracks
Also check whether the bumper is still securely mounted to the vehicle.
A crack in the cover is one problem. Broken mounting tabs are another.
If the bumper is hanging because its mounts are destroyed, stitching only the visible crack may not make it secure.
Step 2: Clean the Cracked Area
Wash dirt and road grime away from the damaged area.
Clean plastic makes it easier to:
- See the full crack
- Find hidden damage
- Align the edges
- Mark hole positions accurately
Dry the area before marking.
You do not need to polish the bumper before stitching, but heavy dirt should not remain around the repair.
Step 3: Align the Crack
Push the broken edges back into their natural position.
Try to align:
- Panel contours
- Body lines
- Corners
- Surface height
Painter’s tape can help temporarily hold the pieces in place.
Do not force one side over the other.
If the crack is under heavy tension even when aligned, investigate whether the bumper is distorted or another mounting point is pulling it out of shape.
Step 4: Mark the Stitch Holes
Use a marker to create matching hole positions on both sides of the crack.
The holes should generally be:
- Evenly spaced
- Similar distances from the crack
- Far enough from the damaged edge to avoid tearing through
There is no universal spacing that works for every bumper.
Plastic thickness, crack shape, zip-tie size, and surrounding damage all matter.
The goal is to leave enough material between the hole and crack so the zip tie has something strong to pull against.
A neat pattern also makes the finished repair look much better.
Step 5: Drill the Holes
Choose a drill bit only large enough for the zip ties you plan to use.
Drill slowly through each marked location.
Avoid pushing hard enough to flex or split the bumper.
If possible, support the plastic from behind.
Most importantly, know what is behind the panel before drilling.
You do not want the bit to contact:
- Wiring
- Sensor harnesses
- Fluid lines
- Electronic modules
Wear eye protection because plastic chips can fly while drilling.
Should You Drill a Stop-Hole at the End of the Crack?
A small stop-hole is sometimes used at the tip of a crack to reduce stress concentration and make it less likely that the crack continues spreading.
This can be useful in certain plastic repairs, but it is not automatically necessary for every bumper crack.
The hole must be positioned correctly and should not remove more material than necessary.
If the crack is already near an edge or mounting point, drilling another hole may weaken the area rather than improve it.
Step 6: Thread the Zip Ties
Once the holes are drilled, begin threading the zip ties.
There are several possible patterns.
Straight Stitch
Individual ties cross directly over the crack.
This is simple and easy to install.
X-Pattern
The ties cross diagonally, creating a visible X-shaped pattern.
This is often associated with the classic drift or Frankenstein-style appearance.
Ladder Pattern
Multiple ties run in a repeated parallel arrangement.
This creates an organized, mechanical look.
The pattern mostly affects appearance and how the load is distributed locally. It does not restore the original structural properties of the bumper plastic.
Step 7: Tighten the Zip Ties Gradually
Do not fully tighten the first zip tie and then move directly to the next.
Instead:
- Install the ties loosely.
- Check bumper alignment.
- Tighten each tie a little.
- Move back and forth across the crack.
- Continue until the edges are held together.
Gradual tightening helps prevent the repair from pulling toward one side.
It also reduces the chance of distorting the bumper cover.
How Tight Should the Zip Ties Be?
The ties should be tight enough to keep the crack closed and reduce movement.
They should not be so tight that they:
- Dig into the plastic
- Stretch the drilled holes
- Bend the bumper surface
- Pull the crack into an unnatural shape
- Create new splits around the holes
Overtightening can damage the bumper faster than leaving a small amount of flexibility in the repair.
Stop tightening once the crack is properly aligned and secure.
Step 8: Trim the Zip-Tie Tails
After the ties are secure, trim the long tails with side cutters.
Try to avoid leaving sharp ends.
Sharp plastic edges can:
- Scratch skin
- Catch clothing
- Snag cleaning towels
For a neat drift-style repair, orient the locking heads consistently before trimming.
Small details make the finished stitch look much more intentional.
Should the Zip-Tie Heads Be Inside or Outside?
Either arrangement can work.
Outside
Leaving the heads outside gives you the classic visible stitched appearance.
Advantages:
- Easy to install
- Easy to inspect
- Strong visual style
Inside
If you can access the back of the bumper, the tie heads may be hidden.
Advantages:
- Cleaner exterior
- Less obvious repair
The crack will still be visible unless the surface is refinished.
Also make sure hidden zip ties do not interfere with wiring, sensors, or nearby components.
Can You Stitch the Bumper From the Back?
Yes.
Backside stitching can provide a cleaner appearance because most of the zip-tie hardware remains hidden.
However, access may require removing the bumper cover.
You can also use zip ties temporarily to hold the crack in alignment while applying a more permanent backside repair.
That can be useful when combining stitching with:
- Plastic welding
- Hot staples
- Repair adhesive
- Reinforcement mesh
How to Make a Zip-Tie Repair Stronger
If you want more than a simple temporary stitch, reinforce the crack from behind.
Possible methods include:
Plastic Welding
Compatible plastic can be fused together using controlled heat and appropriate repair material.
When performed correctly, this can create a much more integrated repair.
Hot Staples
Heated metal staples can reinforce a crack from the backside.
They are particularly useful for stabilizing splits before further refinishing.
Plastic Repair Adhesive
Automotive bumper-repair adhesives can bond and reinforce certain plastics when the surface is prepared correctly.
Reinforcement Mesh
Some repair systems use backing mesh to spread loads over a wider area.
The correct method depends on the bumper plastic and the damage.
Zip-Tie Stitch vs. Other Bumper Repairs
| Repair Method | Speed | Appearance | Strength Potential | Skill Level |
| Zip-tie stitch | Fast | Visible | Moderate/temporary | Easy |
| Plastic welding | Moderate | Can be hidden | Higher when done properly | Higher |
| Hot staples | Moderate | Usually hidden | Good reinforcement | Moderate |
| Repair adhesive | Moderate | Can be refinished | Good with correct preparation | Moderate |
| Bumper replacement | More involved | Factory-like | Best for severe damage | Varies |
Zip ties win on simplicity and speed.
They do not usually win when the goal is an invisible, factory-like repair.
Is Zip-Tie Stitching Permanent?
It can last a long time in some situations, but it should not be described as a true permanent restoration.
Durability depends on:
- Crack location
- Bumper flexibility
- Plastic condition
- Vibration
- UV exposure
- Heat
- Quality of the ties
- Hole placement
- Future impacts
Zip ties can become brittle over time, and drilled holes can slowly enlarge if the bumper flexes repeatedly.
Inspect the repair occasionally.
Look for:
- Loose ties
- Elongated holes
- New cracks
- Distortion around the repair
What Type of Zip Ties Should You Use?
Use ties that are:
- Strong enough for the application
- Suitable for outdoor exposure
- Appropriately sized for the holes
- Flexible enough to tighten without snapping
UV-resistant zip ties can be helpful on exposed exterior repairs.
Avoid using huge ties simply because they seem stronger.
Larger ties require larger holes, which removes more bumper material.
Can Zip Ties Melt Near the Exhaust?
Heat can weaken plastic zip ties.
Avoid using this method where ties are exposed to extreme heat from:
- Exhaust outlets
- Turbo components
- Hot engine parts
A repair near an exhaust opening should maintain proper clearance from hot components.
If the surrounding bumper has already melted or deformed from heat, fix the heat source before stitching the damage.
Can Zip Ties Damage the Bumper?
Yes, if installed incorrectly.
Common causes include:
- Holes too close to the crack
- Overtightening
- Oversized holes
- Brittle old plastic
- Heavy bumper movement
- Incorrect hole alignment
If you see the hole stretching into an oval shape, the bumper is moving too much or the tie is loading the plastic excessively.
Can You Zip-Tie a Bumper Without Drilling?
Sometimes you can use existing openings.
Possible attachment points include:
- Factory mounting holes
- Grille openings
- Existing broken-tab holes
This can work for securing a loose bumper section.
However, the traditional stitched appearance across a crack usually requires paired holes on either side.
Never attach zip ties to wiring or fragile trim just because it is nearby.
Can You Repair Broken Bumper Tabs With Zip Ties?
Sometimes, but this is different from stitching a crack.
Zip ties can temporarily secure a broken tab or bumper corner.
However, broken mounts may be better repaired with:
- Plastic tab repair
- Plastic welding
- Reinforcement
- Replacement bracket
If the bumper can detach while driving, a proper mounting repair is more important than appearance.
What If Part of the Bumper Is Missing?
Zip ties cannot replace missing plastic.
If a chunk is gone, you may need:
- Replacement bumper cover
- Fabricated patch
- Backing material
- Plastic repair system
Stitching works because there are two existing edges available to pull together.
Without both edges, there is nothing to stitch directly.
Can You Paint Over the Zip-Tie Stitch?
You can choose to leave the repair visible or make it less obvious.
Options include:
- Leave contrasting ties visible
- Use ties closer to bumper color
- Hide ties behind the bumper
- Refinish the repaired area later
Painting the ties does not make the repair stronger.
If you want a smooth factory appearance, repair the plastic itself and refinish the bumper rather than relying on visible stitches.
How to Repair the Bumper More Permanently Later
A zip-tie stitch can also serve as a temporary repair until you have time for proper bodywork.
A more complete repair may involve:
- Remove the bumper cover.
- Inspect the entire crack.
- Check mounting points.
- Clean and prepare the damaged plastic.
- Weld, staple, or bond the crack from behind.
- Reinforce the area if necessary.
- Finish the exterior surface.
- Prime and repaint if required.
If the damage is too severe, replacing the cover may make more sense.
When Should You Replace the Bumper Instead?
Consider replacement or professional repair when:
- Large sections are missing
- Bumper is badly distorted
- Multiple major cracks are present
- Important mounting points are destroyed
- Reinforcement beam is damaged
- Energy absorber is crushed
- Sensors or sensor mounts are damaged
- Bumper cannot be securely retained
Remember that the visible bumper cover is part of a larger crash-management system.
A cosmetic stitching technique should never be used to hide more serious collision damage.
Common Zip-Tie Bumper Repair Mistakes
Avoid these errors:
- Drilling without checking behind the bumper
- Placing holes too close to the crack
- Using uneven hole spacing
- Overtightening the ties
- Using brittle low-quality ties
- Ignoring damaged bumper mounts
- Drilling around sensors without inspection
- Treating the bumper cover as the entire crash structure
- Leaving sharp zip-tie tails
- Using plastic ties near excessive heat
- Trying to stitch missing pieces together
- Calling the repair factory-strength
Frequently Asked Questions
How Do You Fix a Cracked Bumper With Zip Ties?
Align the crack, drill matching holes on both sides, thread zip ties through the holes, and tighten them gradually until the bumper edges are held together.
What Is a Drifters’ Stitch?
A drifters’ stitch is a visible bumper repair that uses zip ties laced through drilled holes across a crack.
Does Zip-Tie Stitching a Bumper Actually Work?
Yes, for suitable cosmetic bumper-cover cracks. It can hold the plastic together but does not recreate the original continuous plastic structure.
Is a Zip-Tie Bumper Repair Permanent?
It can last, but it is better considered a mechanical or temporary repair rather than a true permanent restoration.
How Far Apart Should the Zip-Tie Holes Be?
There is no universal measurement. Keep the holes evenly spaced and far enough from the crack edge that the plastic does not tear through.
Should You Drill at the End of a Bumper Crack?
A small stop-hole can sometimes help reduce crack propagation, but it is not necessary in every repair and must be positioned carefully.
Can You Zip-Tie a Bumper Without Removing It?
Yes, if you can safely access the damaged area and verify that nothing important is behind the drill locations.
Can You Repair a Broken Bumper Tab With Zip Ties?
Sometimes as a temporary attachment, but proper tab repair or bracket replacement is usually better for important mounting points.
Can Zip Ties Damage a Plastic Bumper?
Yes. Overtightening, poor hole placement, oversized holes, or brittle plastic can create new cracks.
Can You Hide the Zip Ties Behind the Bumper?
Yes. Backside installation can make the repair less visible, although bumper removal may be necessary.
Is Plastic Welding Better Than Zip Ties?
For a stronger and more factory-like repair, plastic welding can be better when performed correctly on compatible plastic.
When Should a Cracked Bumper Be Replaced?
Replacement is appropriate when damage is extensive, large pieces are missing, critical mounts are destroyed, or crash and sensor components are affected.
Conclusion
Fixing a cracked bumper with zip ties using the drifters’ stitch method can be a fast and inexpensive way to hold a damaged plastic bumper cover together, provided the crack is non-structural and there are no damaged sensors, crash components, or critical mounting points behind it.
Start by inspecting what is behind the bumper before drilling. Once you know the area is suitable, clean and align the crack, mark evenly spaced holes, and drill only large enough for the ties you are using.
Install all the zip ties loosely before tightening them. Gradually tension the entire stitch so the bumper remains aligned without concentrating too much force around one hole.
The repair can be surprisingly effective for cosmetic cracks, especially on drift cars, project cars, or temporary repairs. However, zip ties simply pull the damaged plastic together. They do not fuse it or restore factory crash performance.
For a cleaner or stronger long-term repair, consider backside reinforcement, plastic welding, hot staples, repair adhesive, or bumper replacement.
The drifters’ stitch works because it mechanically pulls a cracked bumper cover back together. It is fast, cheap, and visually distinctive, but it should be used for appropriate cosmetic bumper damage—not as a substitute for repairing structural crash components, damaged safety-system mounts, or severe collision damage.
